A Trigger is an event that will initiate a Workflow. Every Workflow must start with a Trigger and can have only one Trigger. All Triggers are defined by conditions. A Trigger will only fire and initiate a Workflow when all conditions are met.
Start creating your Workflow by selecting the Trigger and configuring it accordingly.
Here is the list of available Triggers:
Trigger | Description |
|---|---|
Conversation Opened | Triggered when a conversation with the Contact is opened. |
Conversation Closed | Triggered when a conversation with the Contact is closed. |
Contact Tag Updated | Triggered when a specified tag is added to or removed from the Contact. |
Contact Field Updated | Triggered when the specified contact field is updated or edited. |
Shortcut | Triggers when the shortcut is selected from the Inbox module. |
Incoming Webhook | Triggers when an external app or service sends an HTTP POST request. |
Click-to-Chat Ads | Triggers when an Ad is clicked or an Ad related message is received. |
Manual Trigger | Triggers for a Contact when the Trigger Another Workflow Step is executed and linked with a Workflow with this trigger. |
TikTok Messaging Ads | Triggers when a TikTok ad is clicked or a TikTok ad-related message is received. |
Lifecycle Updated | Triggers for a Contact when their Lifecycle stage is updated. |
After the Trigger has been specified, move on to Step configuration. Choose any of the available steps.
Each Trigger setting has an Advanced Settings toggle at the bottom that specifies Trigger once per contact (except for Manual Trigger). This restricts Contacts from ever repeating this Workflow, so they can only go through the Workflow journey a single time.
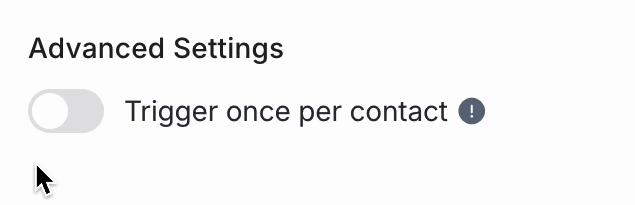
When the toggle is ON, the Workflow will not be triggered for any Contact who has enrolled in this Workflow before, even if the condition was set to OFF when it happened.
Configuration of Trigger
Every Workflow has to start with a Trigger and can only have a single Trigger. When the trigger conditions are met, the Workflow will be carried out sequentially on the triggering Contact.
Initiates the Workflow when a conversation with the Contact is opened and all trigger conditions are met.
Configuration
The trigger condition for this Workflow is limited to source, which identifies how the conversation was opened. Where no conditions are added, the Workflow will trigger whenever a conversation is opened no matter the Source.
The Sources are as follows:
Source | Description |
|---|---|
User | The conversation is opened by the User (outbound conversations).Common use cases:New features updatesFollow-up messages |
Workflow | The conversation is opened by a Workflow step. |
Contact | The conversation is opened by the Contact (inbound conversations).Common use cases:Contact routingContact assignment |
API | The conversation is opened by the Developer API. |
Zapier | The conversation is opened by a Zap. |
Make | The conversation is opened by Make. |
Click-to-Chat Ads | The conversation is opened by clicking on an Ad. |
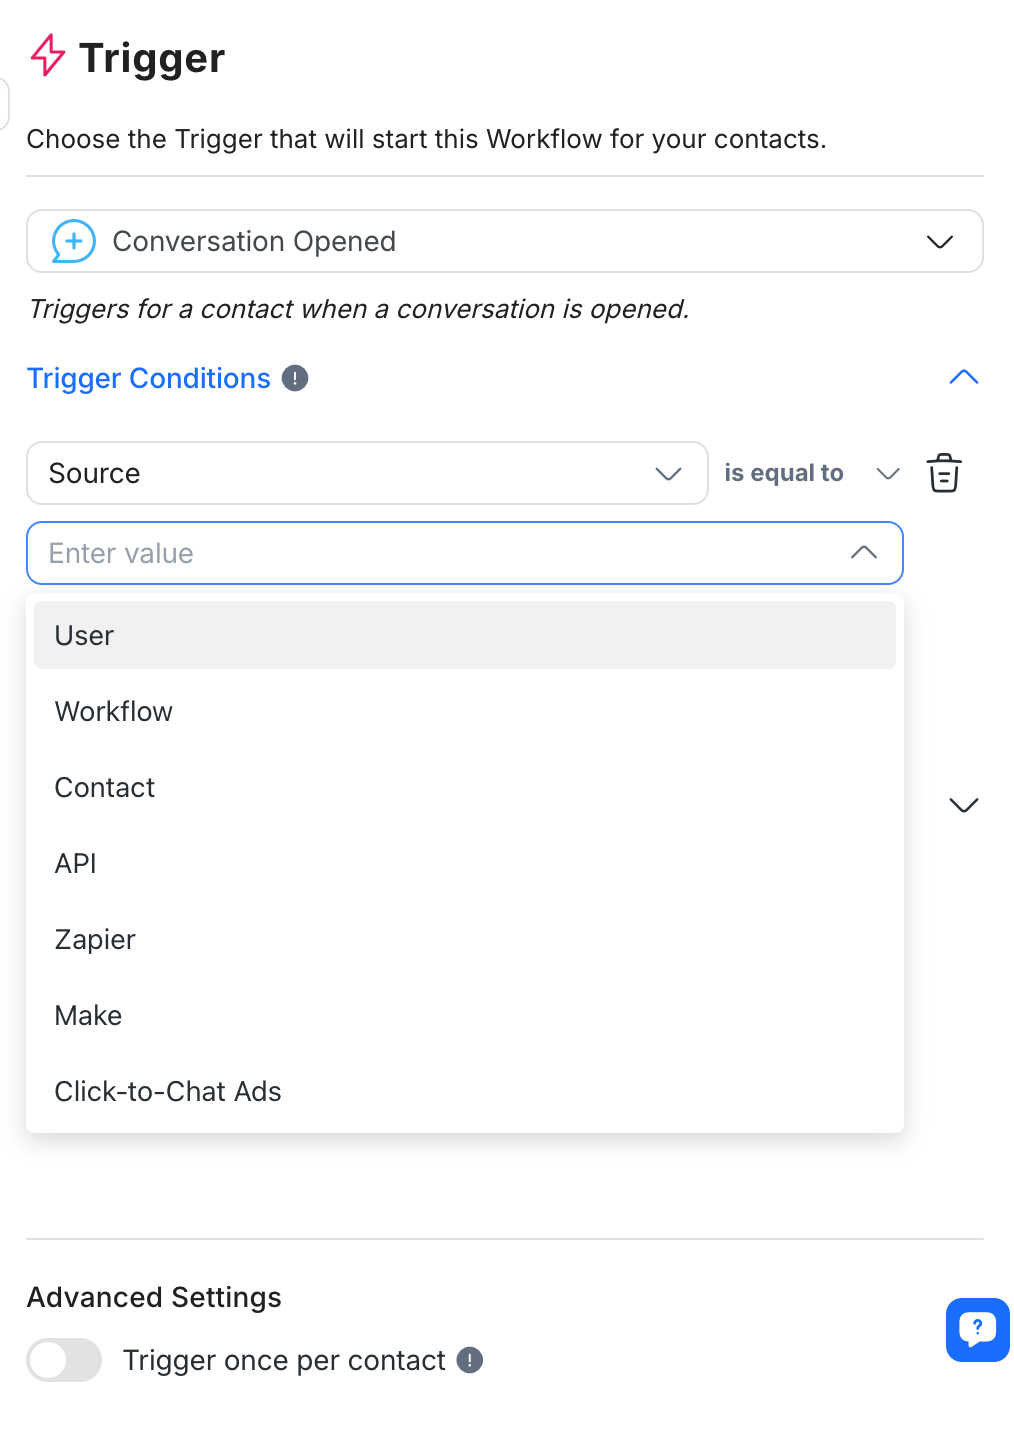
For each Source, a maximum of 10 conditions is allowed with either AND or OR logical operators. Each condition is required to have its own source, an operator and a value.
Trigger Variables
All trigger variables for the Conversation Opened trigger reflect information related to the conversation, such as conversation first incoming message. Learn more about trigger variables for the Conversation Opened trigger here.
Adding conditions to the conversation close trigger is optional. If no conditions are added, the Workflow will trigger whenever a conversation is closed no matter the Source.
Initiates the Workflow when a conversation with the Contact is closed and all trigger conditions are met.
Configuration
There are two possible trigger conditions for Closed Conversations: Source, which identifies who closed the Conversation, and Category, which identifies the conversation's classification.
The following Sources will trigger this Workflow if they close a conversation:
Source | Description |
|---|---|
User | The conversation is closed by the User. |
Workflow | The conversation is closed by a Workflow step. |
Bot | The conversation is closed by bot. |
API | The conversation is closed by the Developer API. |
Zapier | The conversation is closed by a Zap. |
Make | The conversation is closed by Make. |
Conversation closed by merging contact will NOT trigger a Workflow.
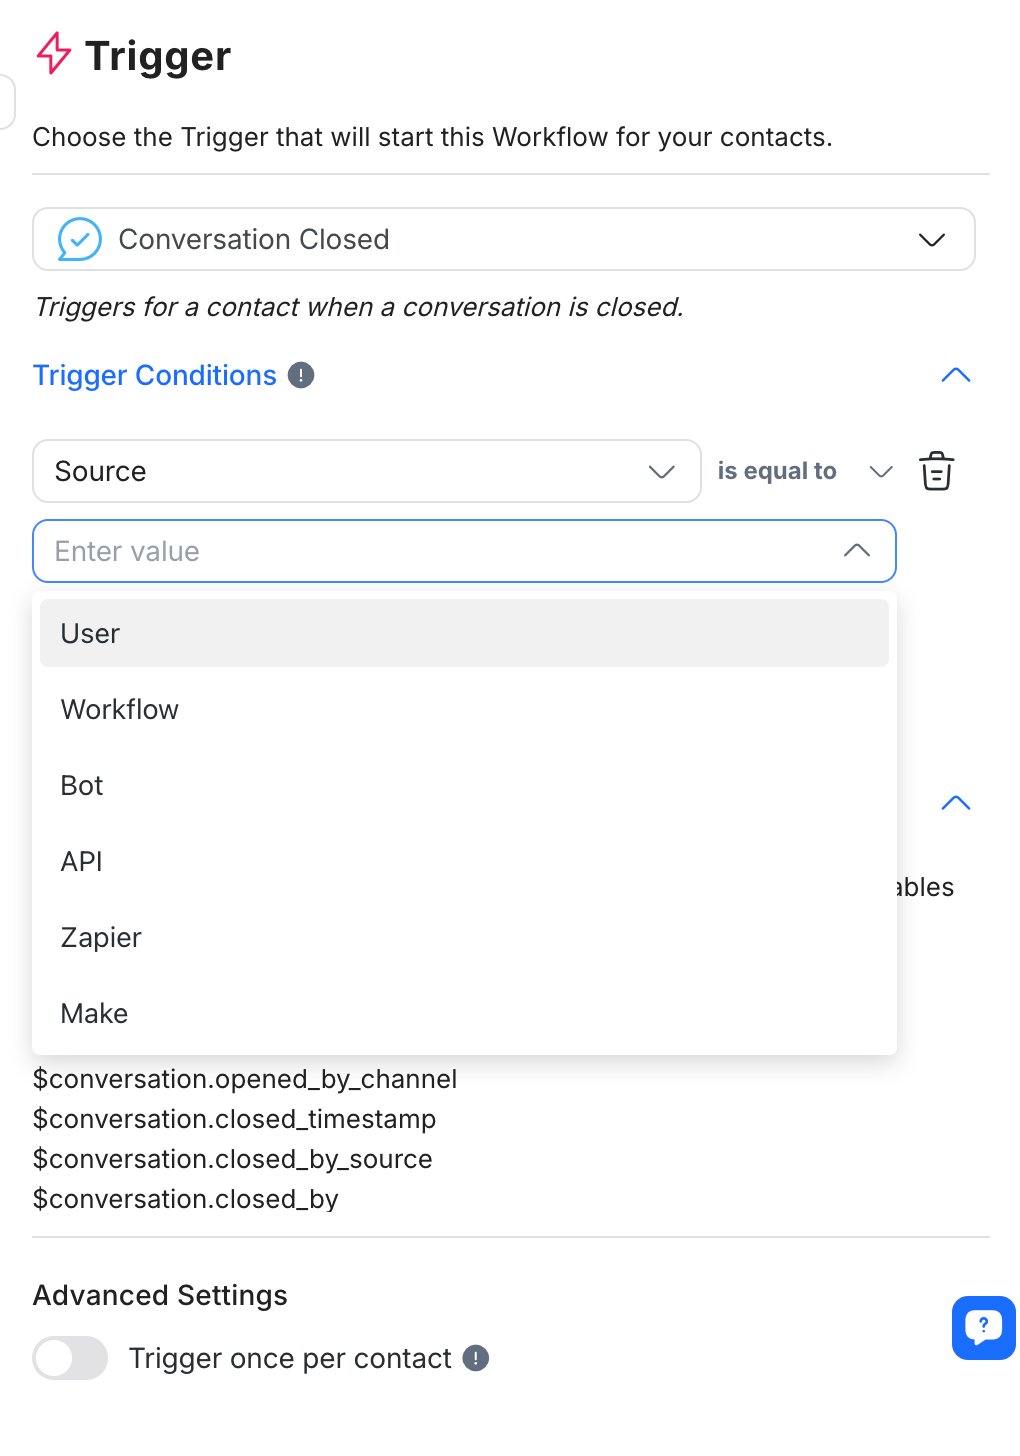
This Workflow will also be triggered if conversations related to specified Categories are closed. These Categories are determined in the Closing Notes section of the platform. In Workflows, they will appear as choices in the dropdown menu for values.
For each Source and Category, a maximum of 10 conditions is allowed with either AND or OR logical operators. Each condition is required to have its own source, an operator and a value.
Trigger Variables
All trigger variables for the Conversation Closed trigger reflect information related to the conversation, such as conversation resolution time, first response time and the closing summary of the conversation. Learn more about trigger variables for the Conversation Closed trigger here.
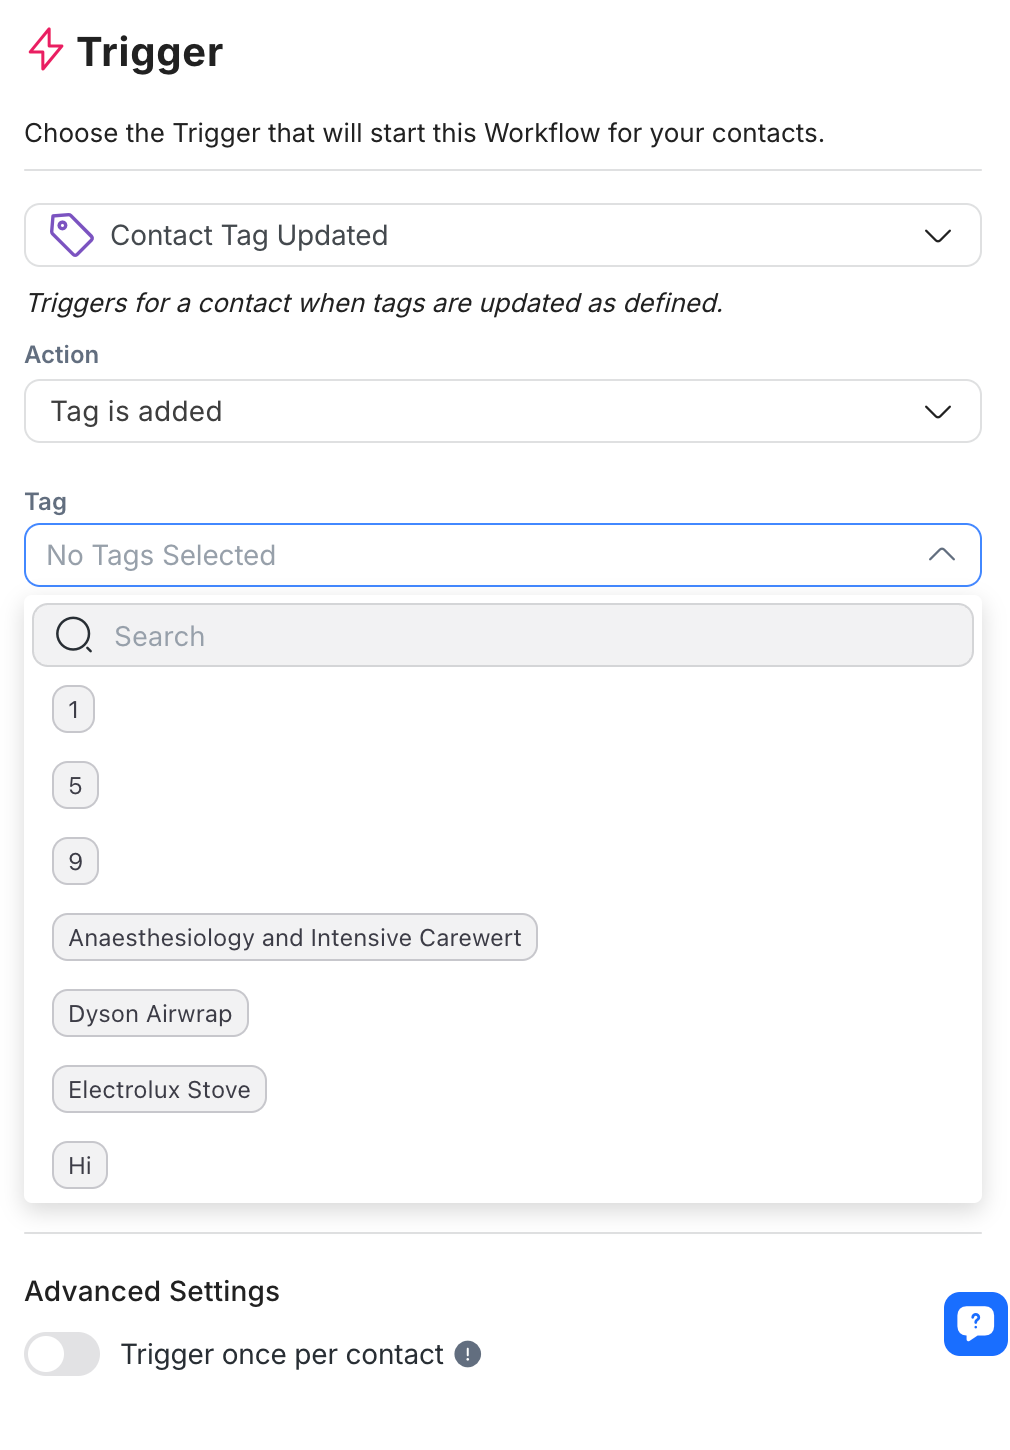
Initiates the Workflow when specified Tags are added to or removed from a Contact.
Configuration
To configure this Workflow, select an action that will act as a Trigger. The options are when a Tag is added to a Contact or when a Tag is removed from the Contact.
Next, select Tag(s) that will be the condition(s) to be met for the Workflow's initiation.
Importing contacts with tags or custom fields doesn't automatically trigger Workflows. To activate Workflows after importing, a secondary action is required. For more information on initiating Workflows post-import, refer to our developer API or integration tools like Make/Zapier.
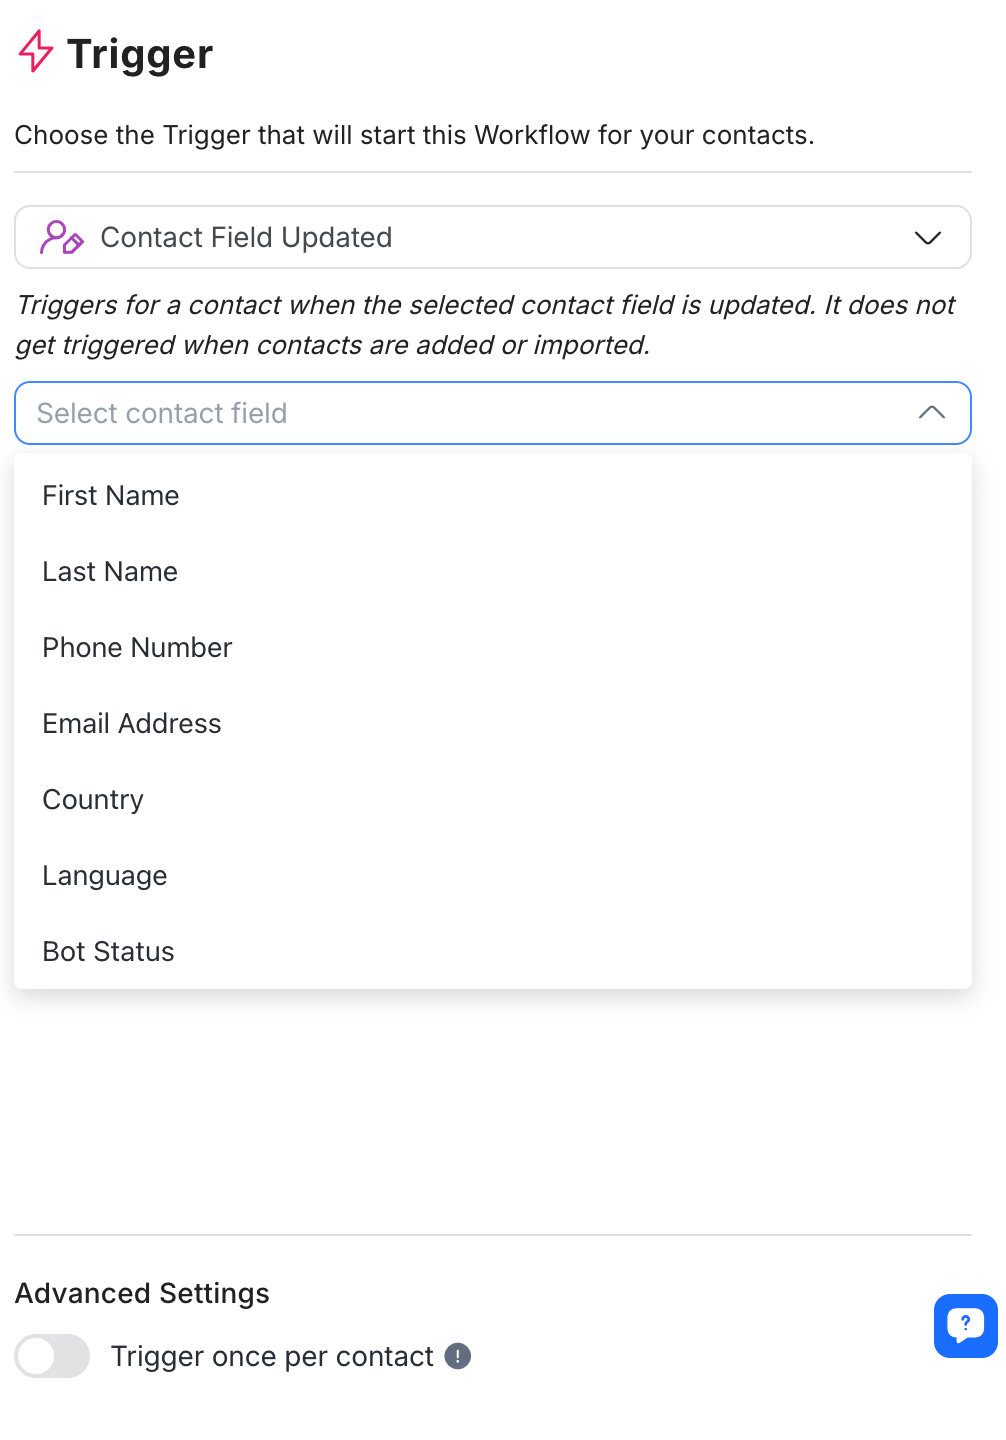
Initiates the Workflow when a specified Contact Field is updated.
Configuration
Any Contact or Custom Field can be configured as a Trigger for this Workflow. Select the Contact Field that will act as a condition for this Trigger. Any update to this field will initiate the Workflow.
Importing contacts with tags or custom fields doesn't automatically trigger Workflows. To activate Workflows after importing, a secondary action is required. For more information on initiating Workflows post-import, refer to our developer API or integration tools like Make/Zapier.
Initiates a selected Workflow from the Shortcut menu in the Inbox module.
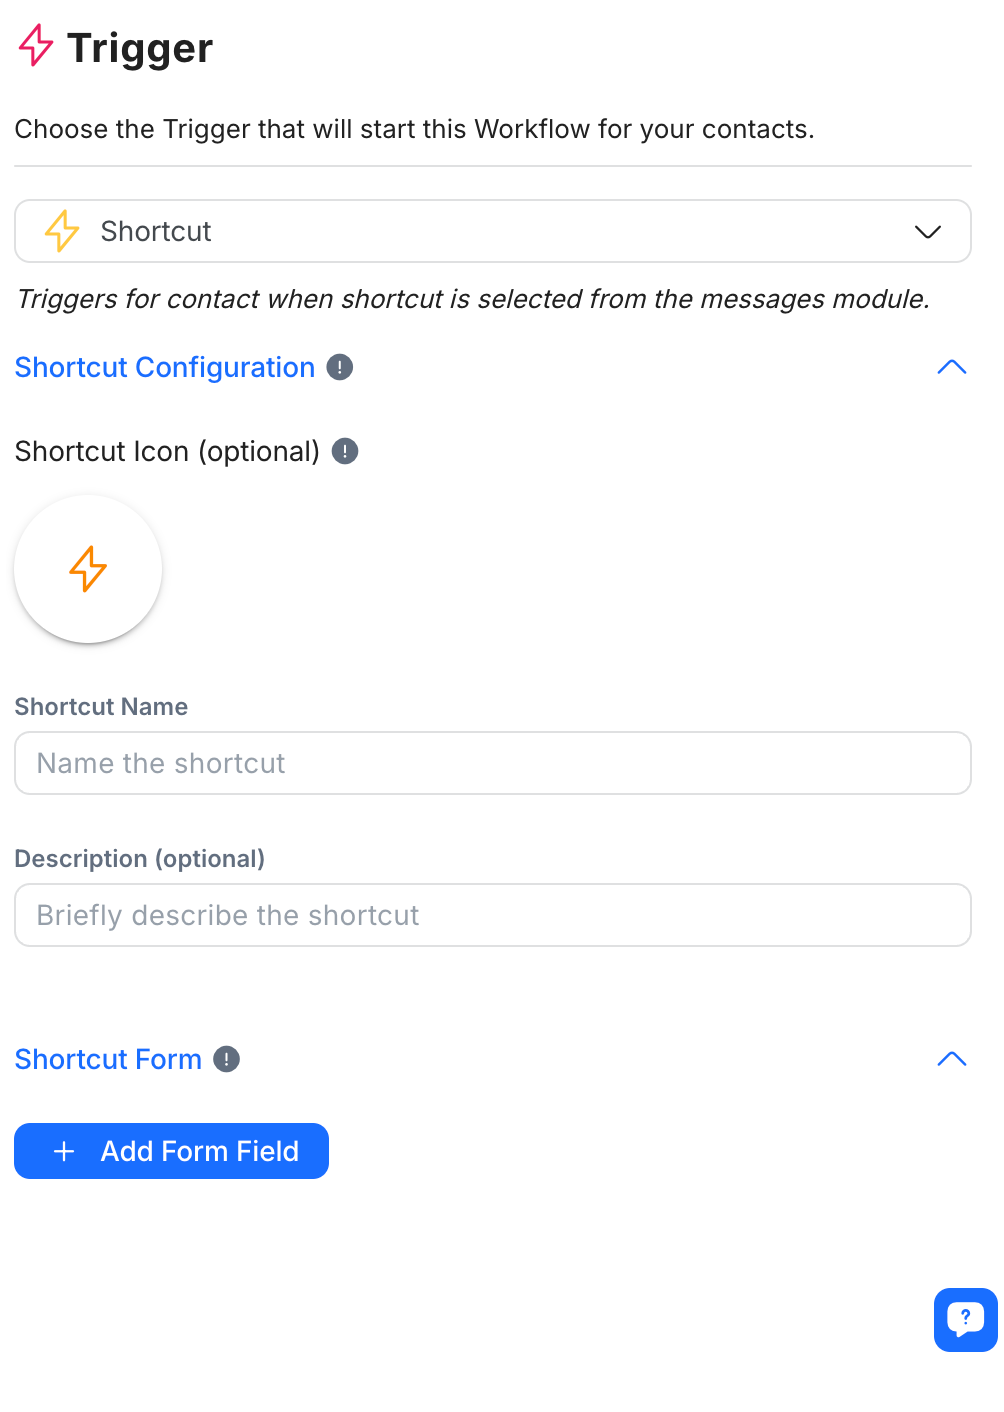
How it Works
Shortcut refers to a Workflow that is created with the trigger ‘Shortcut’. This feature allows Users to launch Workflows that have Shortcut as a trigger without leaving the Inbox module.
In the Inbox module, click the Shortcut icon at the toolbar of the message composer. This will open the Shortcuts menu, which shows all the Shortcuts published in the Workspace. Select the desired Shortcut to initiate its Workflow.
The Shortcut icon will be disabled if there are no Shortcuts created and published in the Workspace.
If you do not wish to allow Agents to initiate Shortcuts, disable it in the Advanced Restrictions settings under Workspace User Settings.
Configuration
You can configure Shortcuts with individual icons, names and descriptions. When the Shortcuts menu opens, these will be displayed to allow you to easily identify and select the desired Shortcut.
Shortcut Form
In the configuration drawer of the Shortcut trigger, you can opt to create a Shortcut form. Any time the Shortcut is triggered, the form will open. The Workflow will only be initiated after the form has been filled in by the User.
The Shortcut form can be customized with form fields to input data or comments. The values filled in can be saved as variables and used in the Workflow.
To add a form field:
Click the + Add Form Field button.
Name the form field. For e.g. Order ID, Refund Reason.
Select the field type. The available field types are:
Text
List (dropdown)
Checkbox
Number
Date
Time
Phone Number
URL
4. Name the variable for this field.
5. Use the output variables in the Workflow Steps. Learn more about output variables here.
6. Set the form field as required by switching the Required toggle to ON. This makes it mandatory for Agents to fill in the data or comments.
Initiates the workflow when a specific event occurs on a third party application and the information is sent via HTTP request.
This trigger is available for Business plan and above only.
Configuration
Once you select this trigger, a unique webhook URL is automatically generated for each of your workflows. You will send HTTP POST requests to this URL to eventually trigger the workflow.
You will then need to provide the JSON key in your payload that matches the contact identifier type. This allows our system to identify which Contact or Contacts will be triggered by the workflow. It has a max character limit of 500.
There are three main Contact identifier types (how we identify a Contact):
Contact ID
Phone number
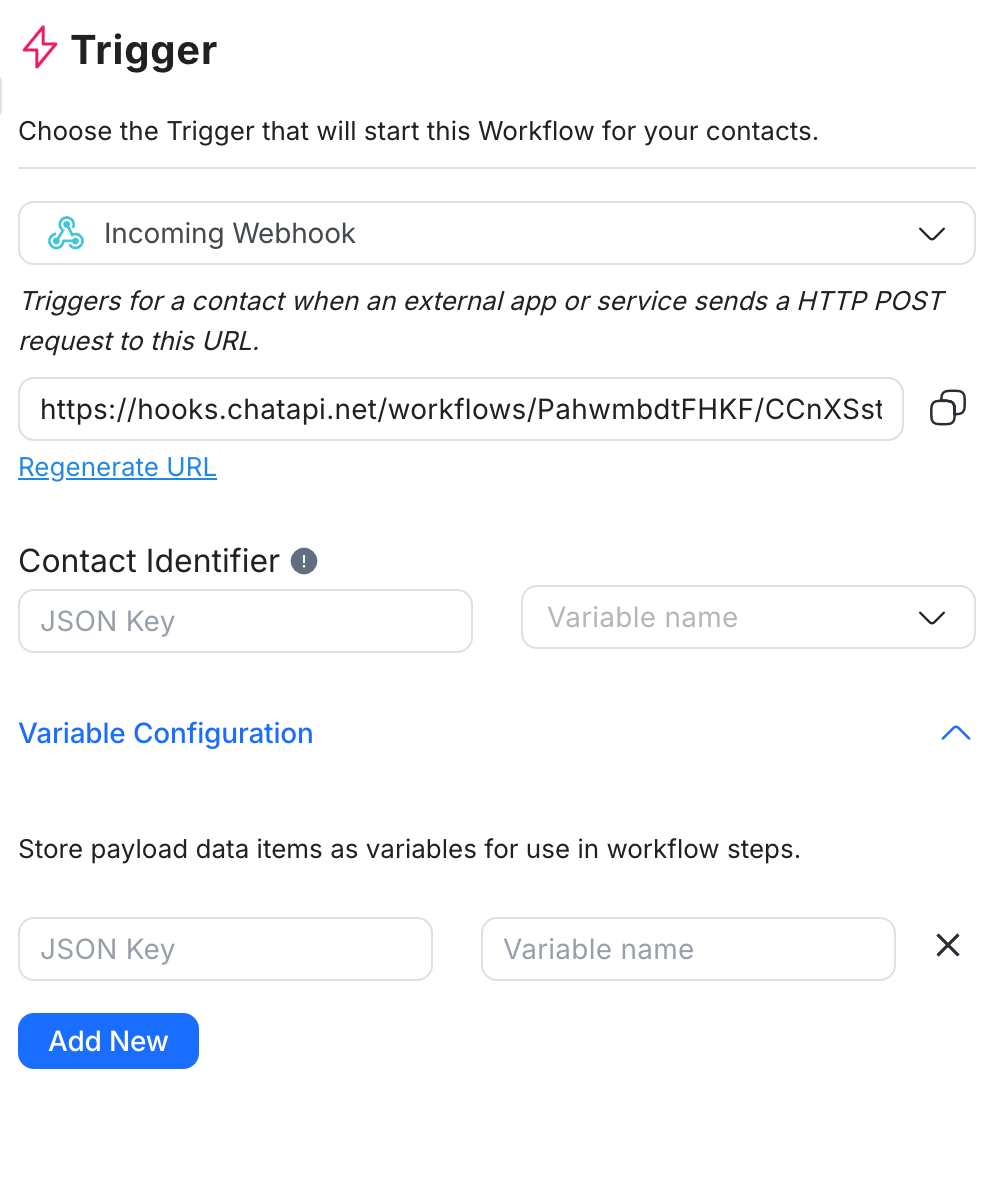
You can also store the parameters in your incoming webhook payload as variables so you can use them in other steps in the workflow depending on your use case.
Requirements:
The JSON key in your payload must match the text in the JSON field on the platform.
The same JSON key cannot be saved twice; it must be a defined value (not an object or an array).
The JSON key has a max character limit of 500.
You will complete the process by saving the JSON key-value to a variable. The variable must be unique in text and has a max character limit of 30. A maximum of 10 variables is allowed. Please note that only JSON body can be saved.
Example
How to fill in the JSON key to save a response for different response formats:
{
    "name": "Jason",
    "zip\_codes": "12345",
    "phone": "123123"
}
To save the phone number in the above JSON Body, use $.phone as the JSON key.
{
    "custom\_fields": {
        "firstName": "John",
        "lastName": "Doe",
        "locale": "en\_GB",
        "timezone": "5",
        "gender": "male",
        "phone": "123123",
        "email": "[email protected]",
        "customerid": "1"
    },
    "created\_at": 1575618542
}
To save the phone number in the above JSON Body, use $.custom_fields.phone.
{
        "data": {
            "id":"1776025372480910",
            "contacts" : \[
                {
                    "firstName":"John",
                    "lastName":"Doe",
		    "locale": "en\_GB"
                },
                {
                    "firstName":"Jane",
                    "lastName":"Doe",
		    "locale": "en\_GB"
                }
	    \]
        }
    }
To save the first name ‘Jane’ in the above JSON Body, use $.data.contacts[1].firstName.
Initiates the workflow when a Facebook Ad is clicked or when a message related to the Ad is received.
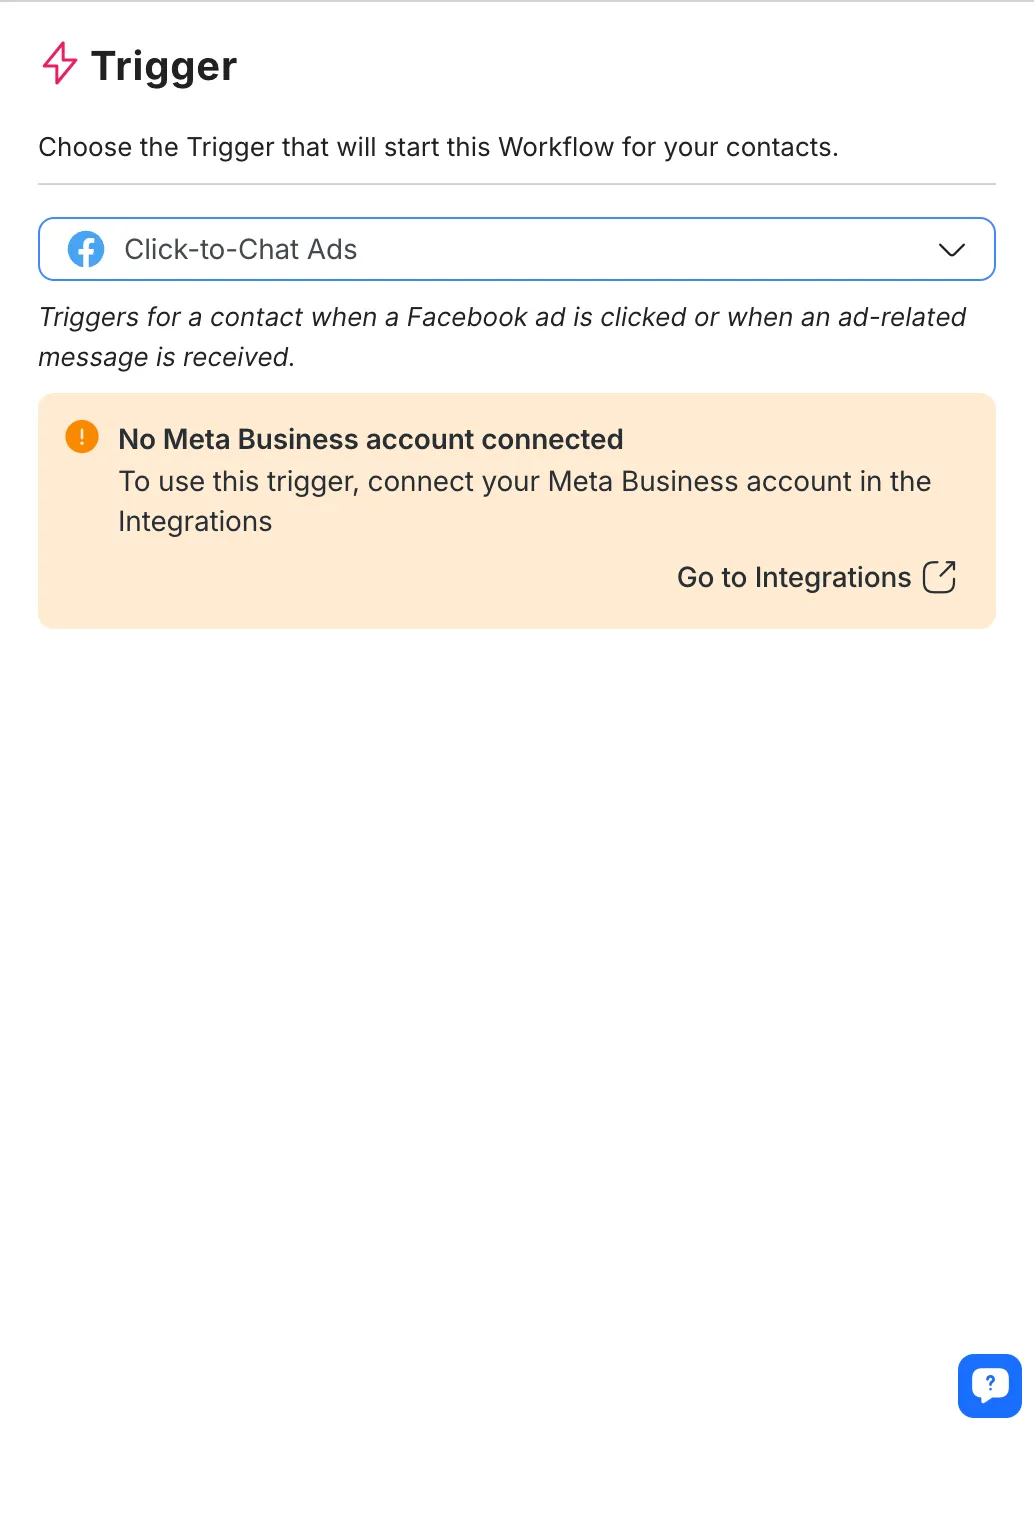
Configuration
After selecting this trigger, connect your Facebook account to configure it.
Once connected to Facebook, select the Ad Account and relevant ads that you want the Trigger to be linked to.
Only ads created and managed in the Ads Manager can be selected from here. If you created Ads from within a Meta application, e.g., Meta Business Suite or Instagram, they will not be listed here for selection.
Ad selection
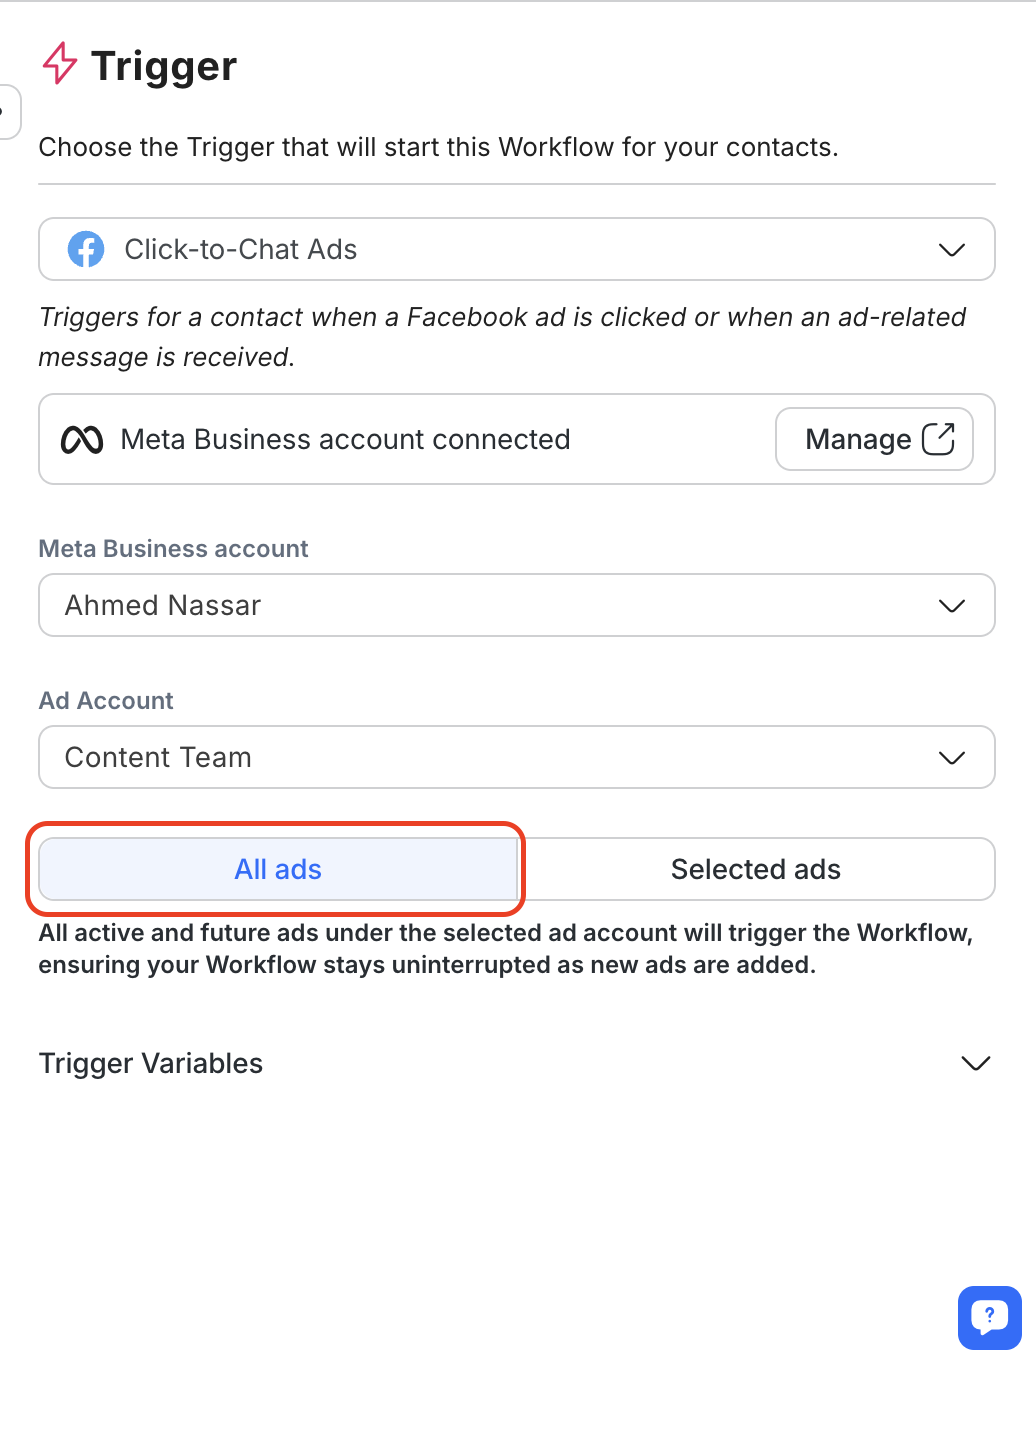
Select All ads to apply to all current and future ads in the selected Ad Account.
To enable this, choose the “All Ads” option from the new segmented control button.
When this option is selected, the Workflow will automatically trigger for all ads managed in the selected Ad Account, including any ads added in the future.
If you prefer to target specific ads, select the “Selected Ads” option to manually choose ads from the dropdown.
Trigger Variables
When a Meta Click-to-Chat ad is triggered, respond.io retrieves metadata from the ad and stores it in Trigger Variables. These variables are useful for personalizing messages, routing leads, and passing campaign data to external tools.
Available variables:
Variable | Description |
|---|---|
$clicktochat.ad_timestamp | Time the ad was clicked |
$clicktochat.ad_first_incoming_message | First message sent by the contact |
$clicktochat.ad_channel_id | ID of the messaging channel |
$clicktochat.ad_channel_type | Channel type (e.g. Messenger, WhatsApp) |
$clicktochat.ad_contact_type | Type of contact (e.g. new or existing) |
$clicktochat.ad_id | Ad ID |
$clicktochat.ad_name | Name of the ad |
$clicktochat.ad_campaign_id | Campaign ID |
$clicktochat.ad_campaign_name | Campaign name |
$clicktochat.ad_adset_id | Ad Set ID |
$clicktochat.ad_adset_name | Ad Set name |
$clicktochat.ad_ad_url | URL of the ad |
$clicktochat.ad_reference | Reference string attached to the ad |
$clicktochat.ad_status | Status of the ad |
$clicktochat.ad_objective | Objective of the campaign (e.g. Leads, Traffic) |
$clicktochat.ad_optimization_goal | Optimization goal defined in Ads Manager |
$clicktochat.ad_destination_type | Destination type (e.g. Messenger, WhatsApp) |
Note: These variables may return null depending on the metadata received from Meta. They are only available during Workflow execution after the ad is triggered.
How to use
Use any variable in your Workflow steps by referencing it with a dollar sign $. For example:
Send a personalized message: Hi! Thanks for clicking on our $clicktochat.ad_name ad!
Add the campaign name to a Google Sheet
Branch workflows based on campaign or ad set
Initiates the workflow when a TikTok ad is clicked or when a message related to the ad is received.
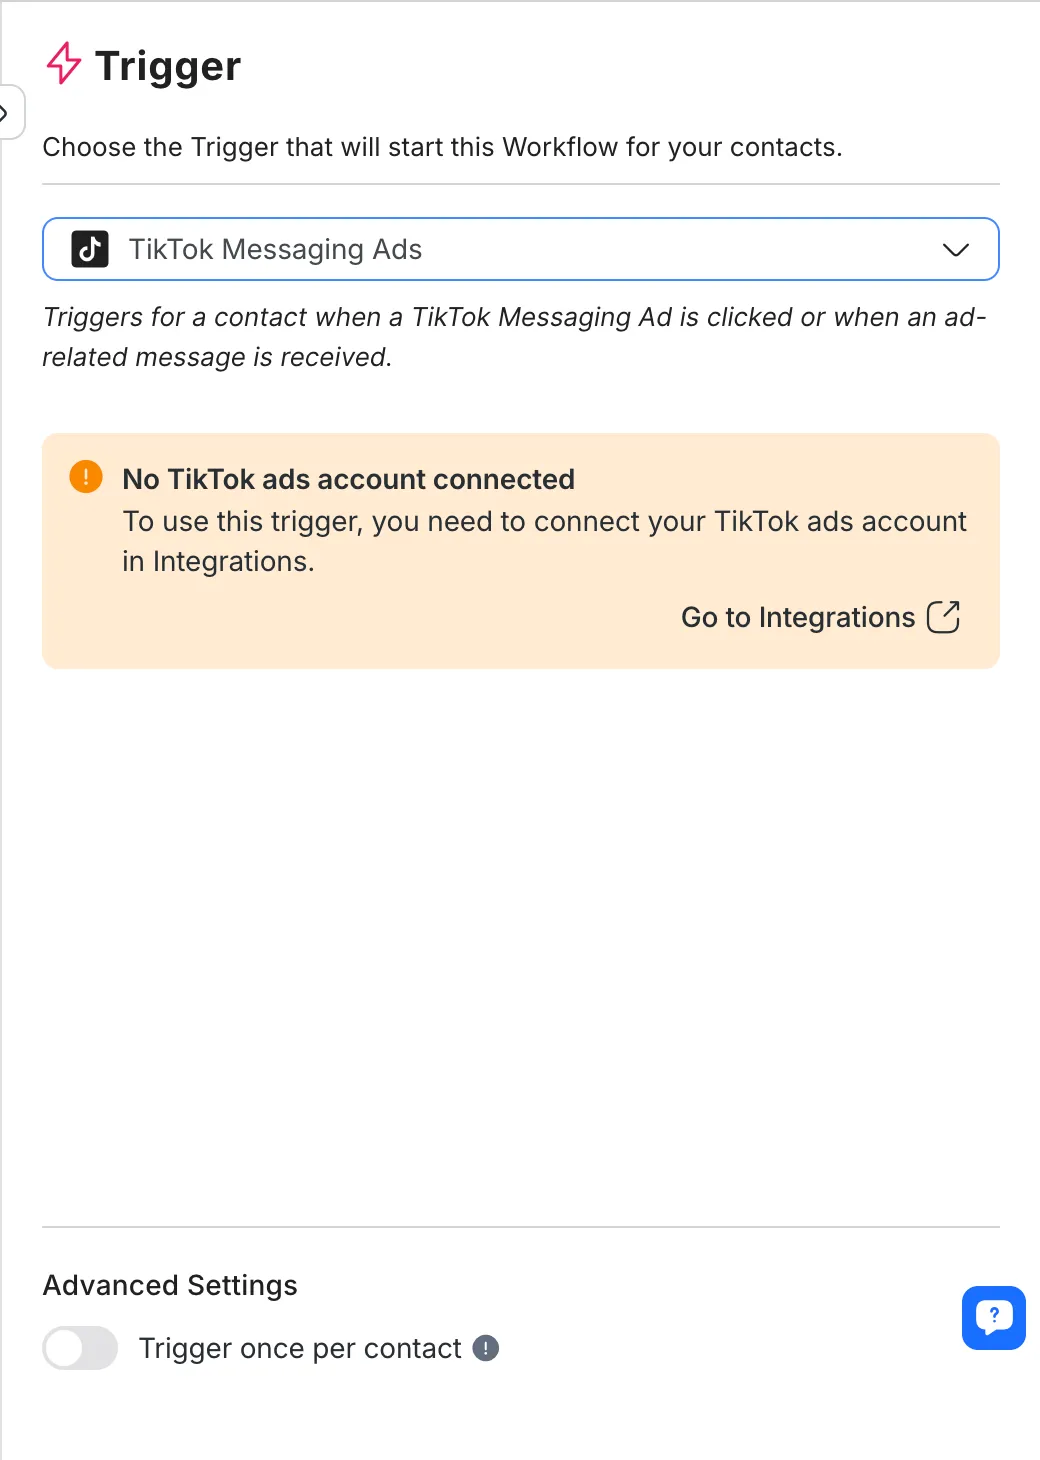
Configuration
After selecting this trigger, connect your TikTok ads account in Integrations to configure it.
Once connected to TikTok, select the Ad Account and relevant ads that you want the trigger to be linked to.
Only ads created and managed in the TikTok Ads Manager can be selected from here.
Ad selection
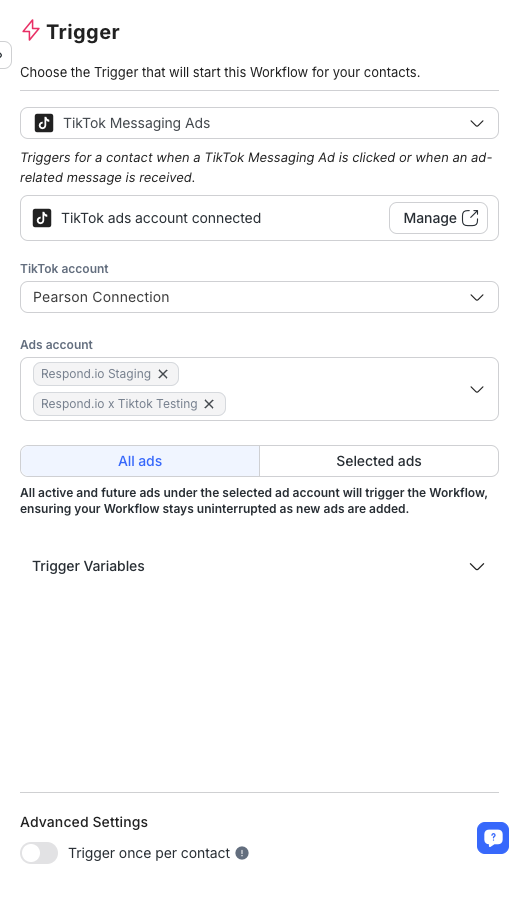
Select All ads to apply to all current and future ads in the selected Ad Account.
To enable this, choose the “All Ads” option from the new segmented control button.
When this option is selected, the Workflow will automatically trigger for all ads managed in the selected Ad Account, including any ads added in the future.
If you prefer to target specific ads, select the “Selected Ads” option to manually choose ads from the dropdown.
Trigger Variables
When a TikTok ad interaction triggers the Workflow, respond.io retrieves metadata about the ad and stores it in Trigger Variables. These variables can be used throughout the Workflow for personalization, routing logic, and integration with external tools (e.g., Google Sheets).
Available variables:
Variable | Description |
|---|---|
$tiktokmessagingad.ad_timestamp | Time the ad was clicked |
$tiktokmessagingad.ad_first_incoming_message | First message sent by the contact |
$tiktokmessagingad.ad_channel_id | ID of the messaging channel |
$tiktokmessagingad.ad_channel_type | Channel type (e.g. TikTok) |
$tiktokmessagingad.ad_contact_type | Type of contact (e.g. new or existing) |
$tiktokmessagingad.ad_id | Ad ID |
$tiktokmessagingad.ad_name | Name of the ad |
$tiktokmessagingad.ad_campaign_id | Campaign ID |
$tiktokmessagingad.ad_campaign_name | Campaign name |
$tiktokmessagingad.ad_adgroup_id | Ad group ID |
$tiktokmessagingad.ad_adgroup_name | Ad group name |
$tiktokmessagingad.ad_operation_status | Operation status of the ad |
$tiktokmessagingad.ad_secondary_status | Secondary status of the ad |
Note: Not all variables may be available for every ad interaction. These variables can return null if the information is not provided by TikTok.
How to use
Use these variables in any Workflow step by referencing them with a dollar sign $. For example:
Add a tag: $tiktokmessagingad.ad_campaign_name
Update a custom field
Pass metadata to external apps via HTTP Request or Google Sheets
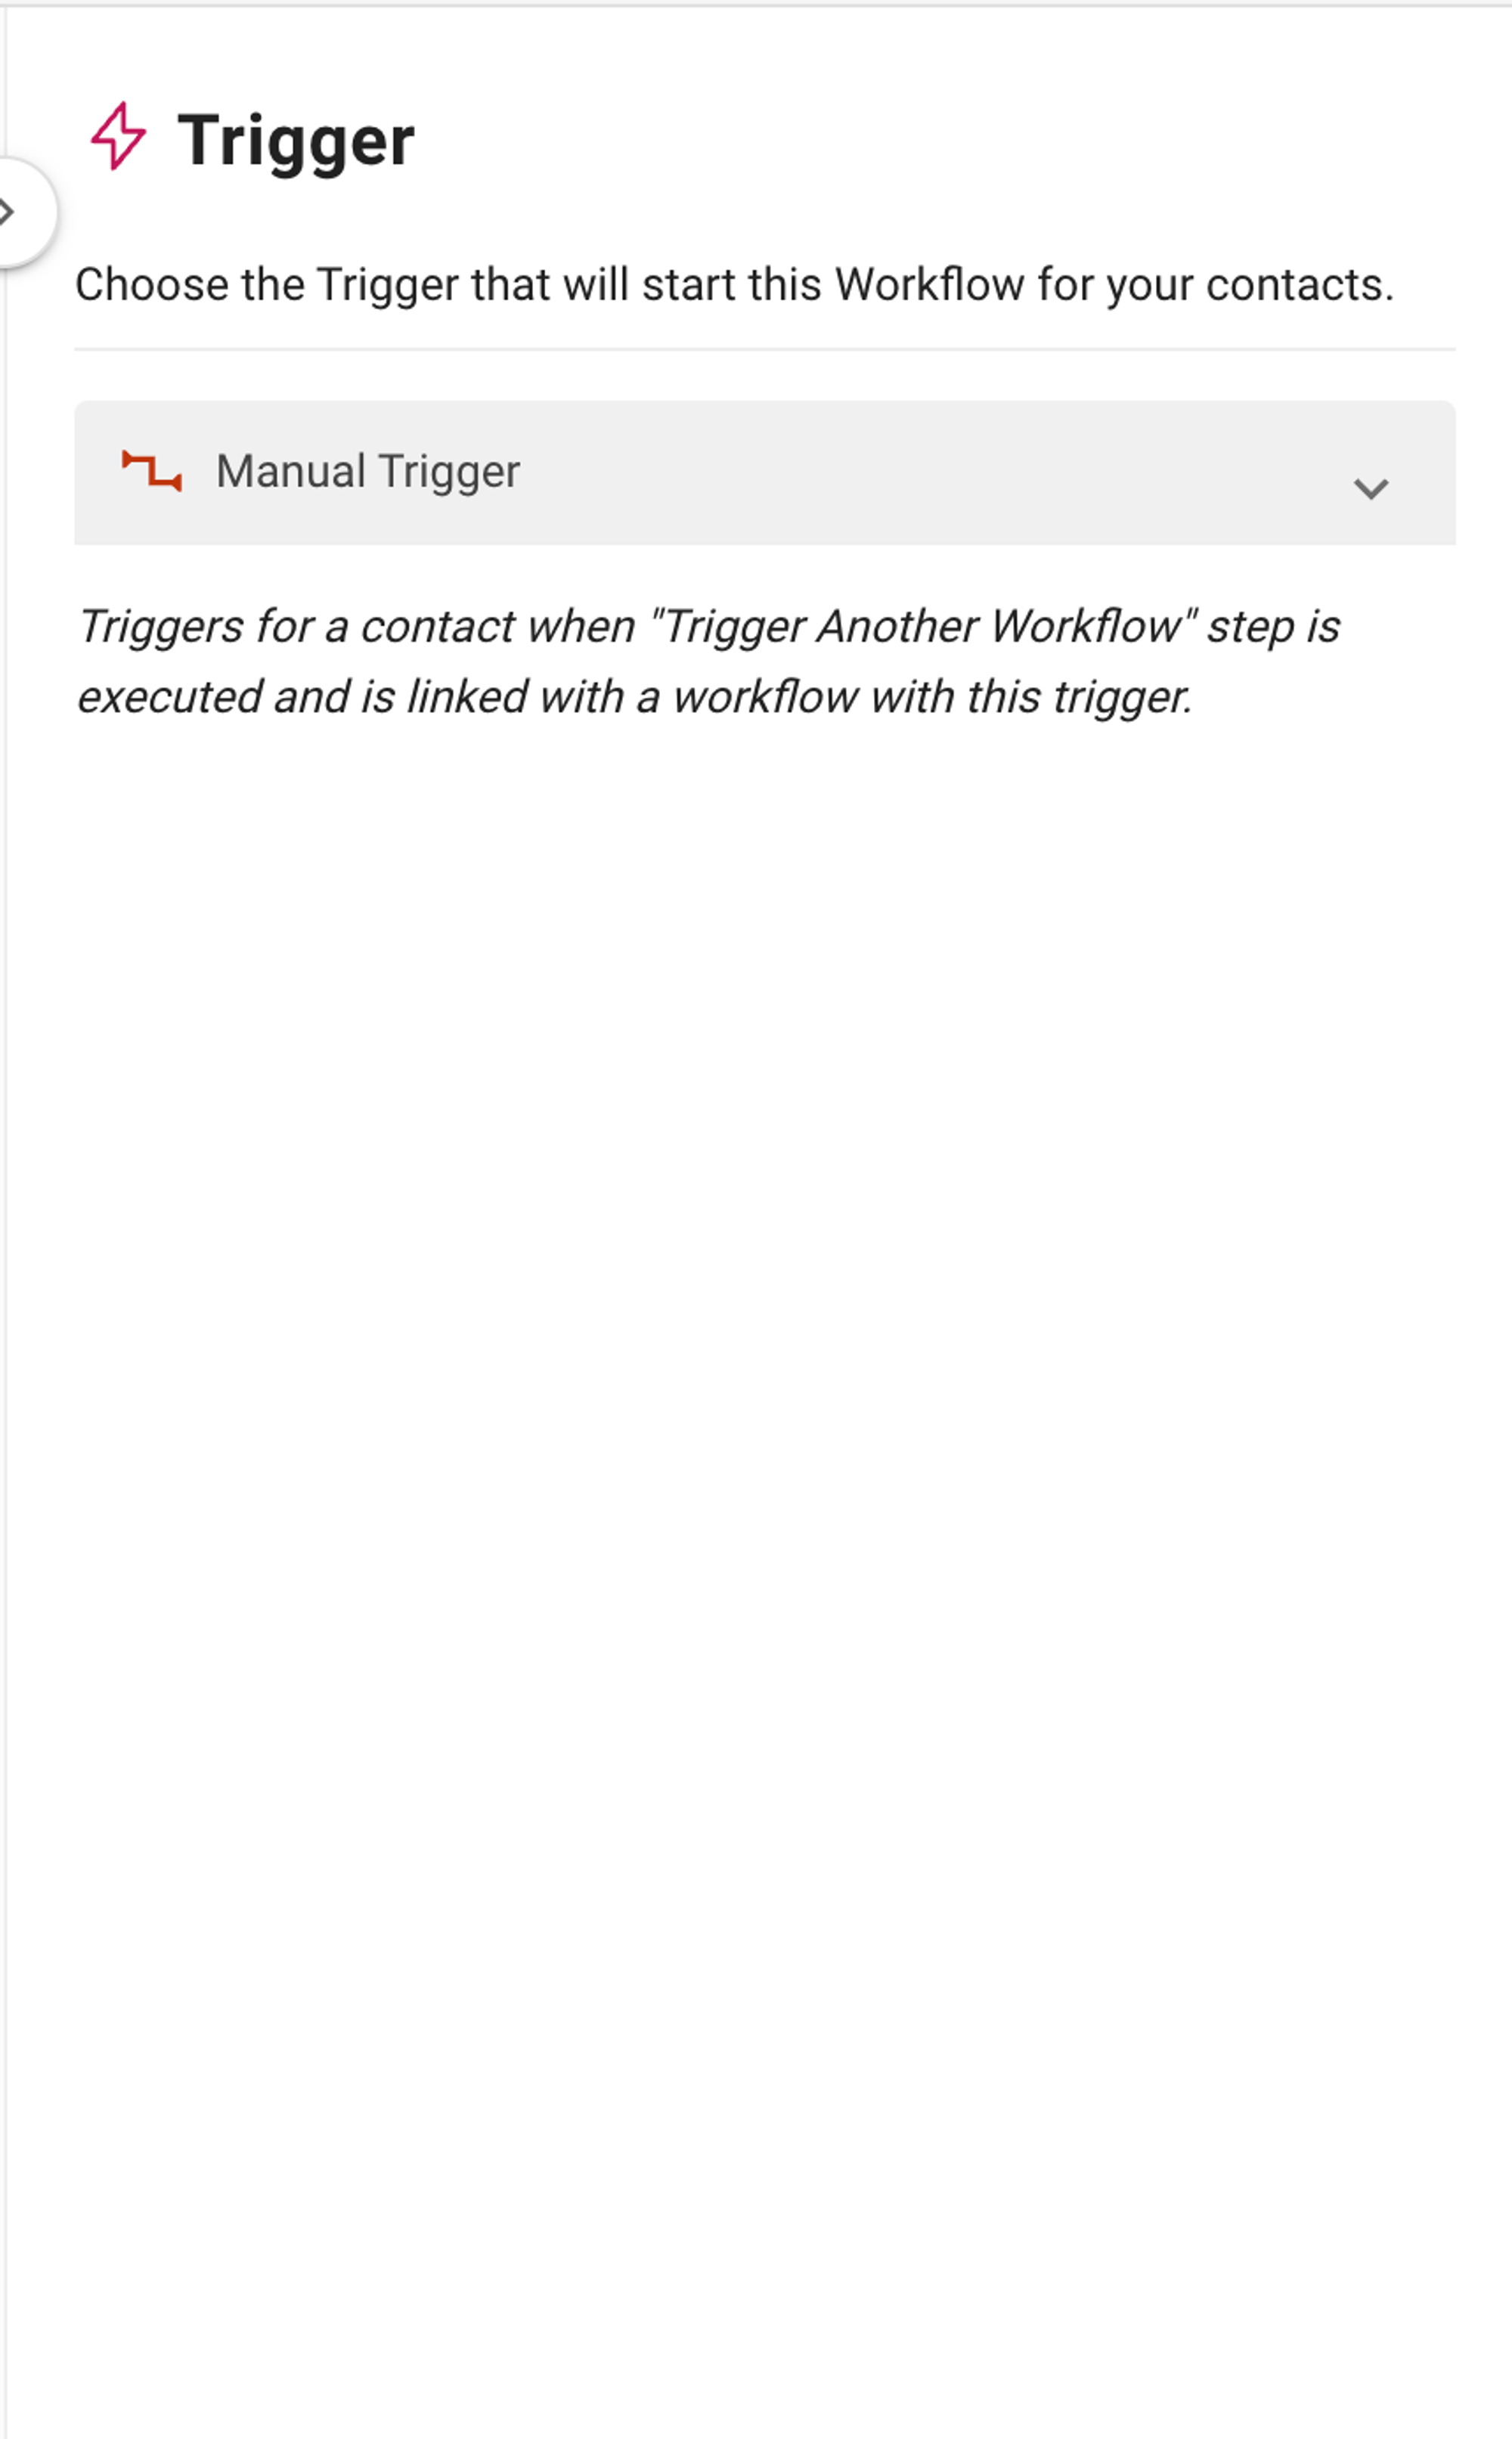
The Manual Trigger can’t work on its own. It can only run through the Trigger Another Workflow Step.
Learn more about the Trigger Another Workflow Step here.
If you’re connecting two or more Workflows together with the Trigger Another Workflow Step, you can use the Manual Trigger on the Workflows connected to the original Workflow. This means the connected Workflows will only work when a Contact enters the Workflow with the Trigger Another Workflow Step.
Configuration
The Manual Trigger can only be used with the Trigger Another Workflow Step.
Let’s say Workflow A is created with the Manual Trigger, and it’s connected to Workflow B. Workflow A will only trigger when Workflow B is published, and a Contact will enter Workflow A through the Trigger Another Workflow Step.
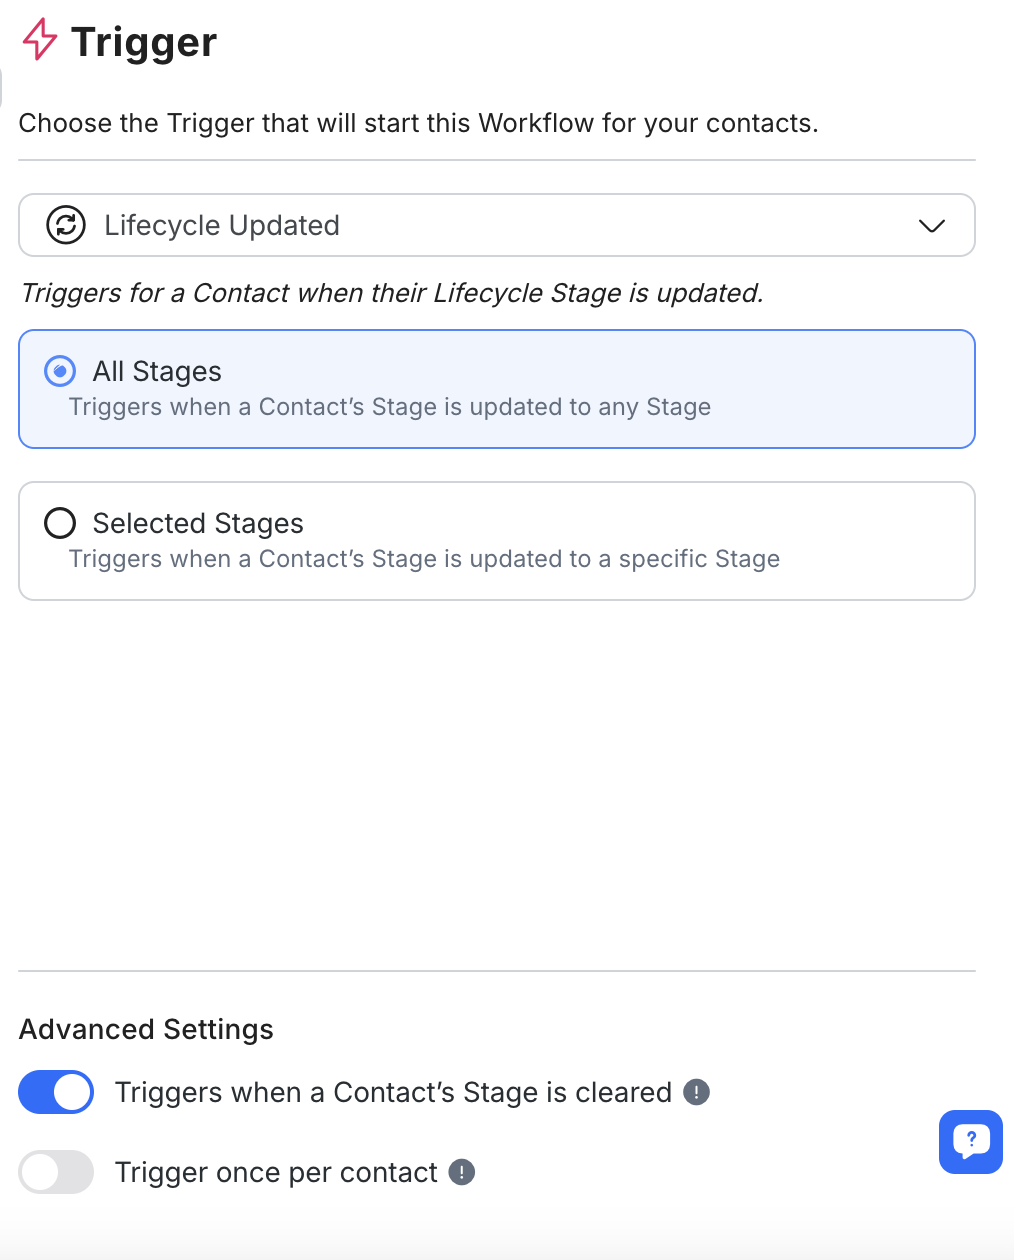
The Lifecycle Updated Trigger initiates a workflow whenever a Contact’s Lifecycle Stage changes. This allows you to automate actions based on Contact progression through your sales stages, such as lead qualification, follow-ups, or customer retention efforts.
Enable Lifecycle in Settings
Ensure the Lifecycle feature is enabled in your workspace settings. If Lifecycle is not enabled, you will need to turn it on before configuring this Trigger.
Select Lifecycle Stage(s)
After selecting this Trigger, choose the Lifecycle Stage(s) that will initiate the workflow.
All Stages: Triggers the workflow whenever a Contact’s Stage is updated, regardless of the specific stage.
Specific Stages: Triggers the workflow only when a Contact’s Stage is updated to one or more selected Stages. You can select one or multiple Stages as needed.
Configure Advanced Settings (Optional)
Trigger When Cleared: Optionally, enable this setting to trigger the Workflow when a Contact’s Lifecycle Stage is cleared, leaving no assigned Stage.
Trigger Once Per Contact: When enabled, this ensures the Workflow is triggered only once for each Contact, even if they re-enter the selected Stage.
Use our Google Sheets template to capture key data and track conversion rates with the Update Lifecycle Step.
If your Click-to-Chat ad isn't appearing as expected, it's likely due to specific settings in your ad configuration not aligning with supported types. Here's what to check:
Supported Channels: Ensure the Channel you are using is supported. Currently, respond.io supports
WhatsApp Business Platform (API)
WhatsApp Cloud API
Facebook Messenger
Ad Status: Ensure your ad is set to eitherActive or Paused.
Campaign Objective: Verify if your ad's objective matches one of the supported types.
Previous Meta ads objective name: BRAND_AWARENESS, LINK_CLICKS, CONVERSIONS, MESSAGES, TRAFFIC, and REACH.
New Meta ads objective name (beta): OUTCOME_ENGAGEMENT, OUTCOME_AWARENESS, OUTCOME_TRAFFIC, OUTCOME_LEADS, and OUTCOME_SALES.
Optimization Goal: Your ad's optimization goals are one of the following: OFFSITE_CONVERSIONS, CONVERSATIONS, IMPRESSIONS, or LINK_CLICKS.
Destination Type: Your ad’s destination types are one of the following: APPLINKS_AUTOMATIC, INSTAGRAM_DIRECT, MESSENGER, APP, or WHATSAPP.


Related articles 👩💻

